Operating Instruction
Switches
The big one is the tactical switch.
The small one is the functional switch.
The toggle switch is for mode switching.
Mode Switching
In any state, turn the toggle switch from left to right, to select between tactical, outdoor and lockout modes.
Tactical Mode
Tap the Tactical switch to momentarily turn on the light, release it the light will go out. Fully press the Tactical switch to constantly turn on the light, press once again to turn off the light.
With the light switched on, press and hold the Functional switch over 1 second to enter Strobe, press and hold the Functional switch again for 1 second to return to General mode.
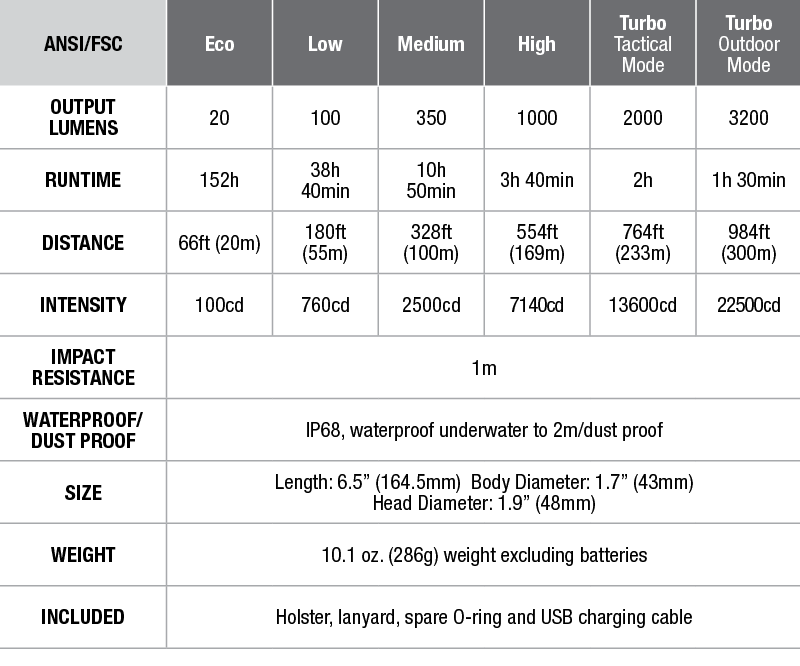
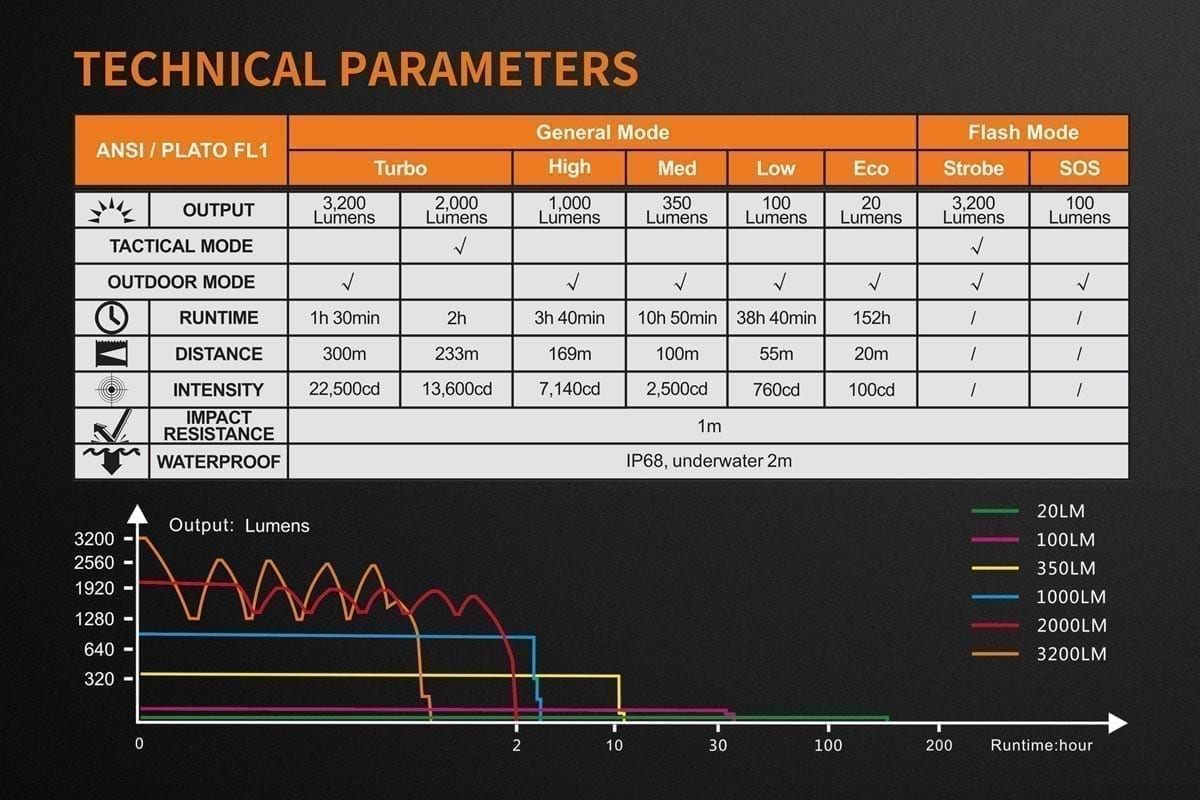
In Tactical mode, only Turbo on General mode and Strobe on Flash mode are available.
Outdoor Mode
Tap the Tactical switch to momentarily turn on the light, release it the light will go out. Fully press the Tactical switch to constantly turn on the light, press once again to turn off the light.
With the light switched on, single click the Functional switch to cycle through Eco→Low→Med→High→Turbo. Press and hold the Functional switch over 1 second to enter Flash mode, press and hold the Functional switch again for 1 second to return to General mode.
In Flash mode, single click the Functional switch to cycle through Strobe→SOS.
Lockout Mode
In any state, turn the toggle switch to off mark, the light will go out and enter lockout status, then the Tactical and Functional switches don’t work. For security, when Tactical switch is switched on, the battery level indicator on the Functional switch will be lit on to remind that Tactical switch is switched on, turn off the Tactical switch, the battery level indicator will go out.
Instant Strobe
With the light switched off, press the Functional switch to enter instant Strobe, release it the light will return to off status. With the light switched on instant Strobe, then simultaneously press the Tactical switch to constantly lock on Strobe mode.
Intelligent Memory Circuit
The light memorizes the last selected brightness level on Outdoor mode. When turned on again the previously used brightness level will be recalled. Strobe is factory defaulted each time the light is turned on Flash mode.
Boot-up Battery Level Indication
Each time the light is turned on, the battery level indicator will automatically display the battery status for 3 seconds.
- Green constant on: saturated
- Green flashes: sufficient
- Red constant on: poor
- Red flashes: critical
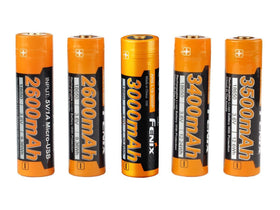
Note: This only works on rechargeable LI-ion 18650 battery.
Intelligent Protection
The light will accumulate a lot of heat when it is working at Turbo mode. When the light is overheated up to 65 ℃ or above, the flashlight will automatically step down a few lumens to reduce the temperature; when the temperature is lower than 65 ℃, the output will gradually return to Turbo output level.
Low-voltage Warning
When the voltage level drops below the preset level with the light switched on, low voltage warning will be activated automatically, then the battery level indicator on the Functional switch will flash red to remind battery replacement or charging. The flashlight is programmed to step down automatically to a lower brightness level until Eco output is reached. To ensure normal use, the flashlight will not turn off until the battery level runs out or once the battery over-discharging protection activates. Note: This only works on 18650 Li-ion battery.
Charging
The battery holder features charging function with a standard Micro USB port.
- Take the battery holder out of the light, plug the USB port of the charging cable into any USB power supply. and plug the Micro USB side of the charging cable into the charging port of the battery holder.
- The charging indicator will display red while charging, and will turn to solid green when fully charged.
Note: Avoid conductive object like coins, screws and keys when taking the battery holder out of the light, to protect from circuit damage caused by electrode short circuit.
Battery Replacement
Unscrew the head to take out the battery holder, and then insert the batteries in accordance with the polarity marks. After loading the batteries into the holder, insert the holder with its convex top towards the light tail. Screw the head back on.
Usage and Maintenance
Disassembling the sealed head can cause damage to the light and will void the warranty.
Fenix recommends using excellent quality battery.
If the flashlight will not be used for an extended period, remove the battery, or the flashlight could be damaged by electrolyte leakage or battery explosion.
Long-term use can result in O-ring wear. To maintain a proper water seal, replace the ring with an approved spare.
Periodic cleaning of the battery contacts improves the flashlight's performance as dirty contacts may cause the flashlight to flicker, shine intermittently or even fail to illuminate for the following reasons:
A: The batteries need replacing.
Solution: Replace batteries (Ensure batteries are inserted according to the manufacturer’s specifications).
B: The threads, PCB board contact or other contacts are dirty.
Solution: Clean the contact points with a cotton swab soaked in rubbing alcohol.
C: The battery protection board is in a protective state and unable to free from it.
Solution: Take out the battery holder and replace it, or replace the batteries.
If the above methods don't work, please contact your authorized distributor.
Warning
This flashlight is a high-intensity lighting device capable of causing eye damage to the user or others. Avoid shining the flashlight directly into anyone’s eyes.


