



Operating Instructions
On/Off
On:
With the light turned off, rotate the rotary switch clockwise from “ICON” to any mode to turn on the flashlight.
With the light unlocked and turned off, press and hold the electronic switch for 0.5 seconds to turn on the flashlight.
Off:
With the light turned on, rotate the rotary switch counterclockwise from any mode to “ICON” to turn off and lock the flashlight.
With the light unlocked, press and hold the electronic switch for 0.5 seconds to turn off the flashlight.
Mode Switching
Rotate the rotary switch to cycle through Lockout↔Spotlight↔Floodlight↔Red light.
Output Selection
Spotlight mode: With the light turned on, single click the electronic switch to cycle through Low→Med→High→Turbo.
Floodlight mode: With the light turned on, single click the electronic switch to cycle through Low→Med→High.
Red light mode: With the light turned on, single click the electronic switch to select between Constant-on and Flash.
Intelligent Memory Circuit
The flashlight automatically memorizes the last selected output of each mode excluding Red light. When turned on again, the last selected output will be recalled.
Battery Specifications
Type | Dimensions | Nominal Voltage | Usability | |
Ni-MH Battery | AAA | 1.2 V | Banned | × |
Alkaline Battery | AAA | 1.5 V | Banned | × |
Non-rechargeable Battery (Lithium) | AAA | 1.5 V | Banned | × |
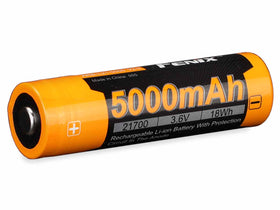
Rechargeable Battery (Li-ion) | 21700 | 3.7 V | Recommended | √√ |
*Do not mix batteries of different types or ages. Doing so may cause damage to the flashlight or to the batteries being used.
*21700 Li-ion batteries are powerful cells designed for commercial applications and must be treated with caution and handled with care. Using low-quality batteries or mishandling batteries (such as short-circuiting or overheating) could lead to combustion and jeopardize the safety of users and property. Any adverse effects resulting from the use of low-quality batteries are not covered by any Fenix warranty or liability. Using quality batteries with circuit protection will reduce the potential for combustion or explosion.
Battery Replacement
Unscrew the bottom battery cover and insert the battery with the anode side (+) towards the light head, then screw the battery cover back on.
Charging
- Turn off the flashlight and open the anti-dust plug to reveal the USB Type-C charging port, then connect the USB Type-C end of the charging cable to the flashlight.
- When charging, one indicator will flash green to display the charging status. The five indicators will be constant-on after charging is completed.
- Once charging is completed, be sure to unplug the charging cable and close the anti-dust plug.
Note:
The normal charging time of the included battery is approximately 3.5 hours from depleted to fully charged with a 5 V/2 A charging adapter.
*This feature only works with a Fenix ARB-L21 Series battery.
Battery Level Indication
With the light turned off, single click the electronic switch to check the battery status and the battery level indicator(s) will last for 3 seconds.
- Five green lights on: 100% - 80%
- Four green lights on: 80% - 60%
- Three green lights on: 60% - 40%
- Two green lights on: 40% - 20%
- One green light on or flashing red (6 Hz): 20% - 1%
*This feature only works with a Fenix ARB-L21 Series battery.
Intelligent Overheat Protection
The flashlight will accumulate a lot of heat when used at high output levels for extended periods. When the flashlight reaches a temperature of 65°C/149°F or above, it will automatically step down a few lumens to reduce the temperature. When the temperature drops below 65°C/149°F, the flashlight will gradually recall the preset output level.
Low-voltage Warning
When the voltage level drops below the preset level, the flashlight is programmed to downshift to a lower brightness level until Low output is reached. When this happens in Low output, one of the battery level indicators blinks red to remind users to recharge or replace the battery in a timely manner.
*This feature only works with a Fenix ARB-L21 Series battery.
Usage and Maintenance
- Disassembling the sealed head can cause damage to the flashlight and will void the warranty.
- Fully charge the flashlight in time to ensure normal function the next time it is needed.
- Fenix recommends using an excellent quality battery.
- If the flashlight will not be used for an extended period, remove the battery, or the flashlight could be damaged by electrolyte leakage.
- Lock the flashlight or remove the battery to prevent accidental activation during storage or transportation.
- Long-term use can result in O-ring wear. To maintain a proper water seal, replace the O-ring with an approved spare.
- Periodic cleaning of the battery contacts improves the flashlight's performance as dirty contacts may cause the flashlight to flicker, shine intermittently or even fail to illuminate for the following reasons:
A: Low battery level.
Solution: Replace or recharge the battery.
B: The contact or contact point of the battery or flashlight is dirty.
Solution: Clean the contact points with a cotton swab soaked in rubbing alcohol.
If the above methods don't work, please contact your authorized distributor.
Warning
- Do NOT place this flashlight in the reach of children!
- Do NOT shine this flashlight directly into anyone’s eyes!
- Do NOT place the light head near flammable objects, high temperatures can cause objects to overheat and become flammable/ignite!
- Do NOT use this flashlight in inappropriate ways such as holding the unit in your mouth, doing so could cause serious personal injury or death if the flashlight or internal battery fails!
- This flashlight will accumulate a significant amount of heat while operating, resulting in a high temperature of the light shell. Pay close attention to prevent burns!
- Turn off and lock the flashlight or remove the battery to prevent accidental activation when the flashlight is placed in a closed and flammable environment such as pockets and backpacks!
- The LEDs of this flashlight are not replaceable; so the whole flashlight will need to be replaced when any one of the LEDs reaches the end of its lifespan.