Operating Instructions
Front And Taillight Pairing
By default, press and hold the taillight switch for about 5 seconds; the taillight indicator will flash red and green alternately, indicating it has entered the pairing mode; then single click the front light switch, the taillight indicator will turn steady green, indicating it has received the front light signal; single click the taillight switch again to confirm, and pairing is complete.
*Note:
- After the initial pairing is completed, the front light automatically remembers the paired taillight, and no further pairing is required.
- During pairing, the straight-line distance between the front light and the taillight should not exceed 1.5 meters.
- The pairing wait time for both the front light and the taillight is 60 seconds; if there is no operation within 60 seconds, the pairing mode will automatically exit.
Front Light Operation
On/Off
Press and hold the front light switch for 0.5 seconds to turn on the front light; press and hold its switch for 0.5 seconds again to turn off the front light.
Output Selection
With the front light turned on, single click the switch to cycle through Low→Med→High→Turbo.
Flash Mode
With the front light turned on, double click the switch to enter the Flash mode; single click the switch again to return to the previously used output of the General mode.
*When the front light battery level is below 10%, the flash mode does not work.
taillight Operation
On/Off
Press and hold the taillight switch for 0.5 seconds to turn the taillight on; press and hold the taillight switch again for 0.5 seconds to turn off the taillight.
Output Selection
With the taillight turned on, single click the taillight switch or the front light switch to cycle through Low→Low Slow-flash→Low Fast-flash→High→High Slow-flash.
The front light switch indicator will simultaneously display the taillight's current output status, steady-on status, or flash frequency.
Standby Mode
With the taillight turned on, press and hold the front light switch for more than 0.5 seconds, and the taillight will enter the standby mode.
During standby, press the taillight switch or the front light switch to wake the taillight and recall the previously used output. If there is no operation within 1 hour after entering standby, the taillight will automatically turn off.
*In standby, the taillight switch indicator's breathing light flashes green. This indicates the unit is in standby; inserting the charging cable keeps it in standby, the indicator will give priority to showing the current charging status; if the charging cable is unplugged and it is still in standby, then the green breathing light will be shown.
Intelligent Memory Circuit
The front and taillights both have intelligent memory circuit excluding Turbo and Flash. When turned on again, the previously used output will be recalled.
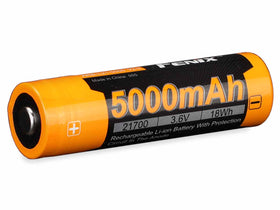
Battery Specifications
Type | Dimensions | Nominal Voltage | Usability | |
Fenix ARB-L21-5000 V2.0 | 21700 | 3.6 V | Recommended | √√ |
Fenix ARB-L21 series | 21700 | 3.6 V | Usable | √ |
Fenix ARB-L18 series | 18650 | 3.6 V | Banned | × |
Rechargeable battery | 21700 | 3.7 V | Banned | × |
Warning:
*21700 Li-ion batteries are powerful cells designed for commercial applications and must be treated with caution and handled with care. Using low-quality batteries or mishandling batteries (such as short-circuiting or overheating) could lead to combustion and jeopardize the safety of users and property. Any adverse effects resulting from the use of low-quality batteries are not covered by any Fenix warranty or liability. Using quality batteries with circuit protection will reduce the potential for combustion or explosion.
Charging
- Open the anti-dust cover, and connect the Type-C end of the charging cable to the charging port of the front or taillight.
- After the front or taillight receives a charging signal, the battery level indicator displays a steady red light, indicating it is charging.
- When the battery level indicator's green light is steady, the battery is fully charged.
Note:
- All outputs of the front or taillight can be used normally while charging.
- When powered off, the normal charging time of the front light is about 3.5 hours from depleted to fully charged; the normal charging time of the taillight is about 1.5 hours from depleted to fully charged.
- Once charging is complete, be sure to close the anti-dust cover and press it firmly to prevent dust or foreign objects from entering.
- Power specifications:
- Charging voltage: 5 V
- Maximum charging power(front light): 15 W (5 V / 3 A) Maximum charging power(taillight): 2.5 W (5 V / 0.5 A)
- Only use a certified USB charging adapter that complies with the government safety standards of the country or region where this product is sold.
Battery Level Indication
Each time the product is turned on, the indicator will show the current battery level and will last for 3 seconds.
- Green light on: saturated 100% - 85%
- Green light flashes: sufficient 85% - 50%
- Red light on: poor 50% - 25%
- Red light flashes: critical 25% - 1%
Note: This feature only works with a Fenix ARB-L21 Series rechargeable battery and is only applicable to the front light.
Battery Replacement
Insert the included battery compartment key into the slot on the front light's tail battery compartment cover, and turn it counterclockwise to open the battery compartment cover. Insert the battery in indicated direction (the battery's anode side should face inward), then tighten the battery compartment cover clockwise.
*Note:
- Using a sharp tool to pry open the battery compartment may damage the compartment and its surface.
- The taillight battery is non-replaceable.
Intelligent Overheat Protection
The product will accumulate a lot of heat when used at high output levels for extended periods. When the product reaches a temperature of 50°C/122°F or above, it will automatically step down a few lumens to reduce the temperature. When the temperature drops below 50°C/122°F, the product will gradually recall the preset output level.
Low-voltage Warning
When the battery level is low, the battery level indicator will blink red at 3 Hz to remind users to recharge the battery in a timely manner. To ensure normal use, the product will not turn off automatically, and the battery level indicator will keep blinking till the battery runs out.
Usage and Maintenance
- Disassembling the sealed heads can cause damage to the product and will void the warranty.
- Fenix recommends using an excellent quality battery.
- If the front light will not be used for an extended period, remove the battery, or the front light could be damaged by electrolyte leakage.
- Recharge a stored product every three months to maintain the optimum performance of the batteries.
- Periodic cleaning of the product and battery contacts improves the product's performance as dirty contacts may cause the product to flicker, shine intermittently or even fail to illuminate for the following reasons:
A: Poor battery level.
Solution: Recharge or replace the battery.
B: The contact or contact point of the battery or the product is dirty.
Solution: Clean the contact points with a cotton swab soaked in rubbing alcohol.
If the above methods don't work, please contact the distributor.
Warning
- Do NOT look directly at the light sources, stare at the beams for a long time, or shine this product directly into the eyes of anyone!
- Do NOT place this product in the reach of children!
- Do NOT place light heads near flammable objects, high temperatures can cause objects to overheat and become flammable/ignite!
- Do NOT use this product in inappropriate ways such as holding the product in your mouth, doing so could cause serious personal injury or death if the lights or internal batteries fail!
- This product will accumulate a significant amount of heat while operating, resulting in a high temperature of the light shells. Pay close attention to avoid burns!
- Turn off this product or remove the battery to prevent accidental activation when the product is placed in a closed and flammable environment such as pockets and backpacks!
- The LEDs of this product are not replaceable; so the whole product will need to be replaced when any one of the LEDs reaches the end of its lifespan.